2005-12-31

New Years Eve

I’m celebrating New Years Eve at a friend’s summer house some hour drive south of Stockholm. On my way there I picked up a headlight and parking light from a Yamaha FZR that I found in an ad some weeks ago. The parking light was cracked when I got the bike, so I needed a new one. The headlight was OK so I really didn’t need that, but I got it anyway since it’s good to have one as a spare.

I wish all the readers of my Blog a happy new year! Hopefully we will do lot’s of quality miles on our bikes in 2006! See you next year!

2005-12-30

Bearings and rear disc hub

The mystery with the cush drive is solved the other day. I spoke to Hans Sjögren who did some of the work on it, and he told me that the stud bolts came loose and damaged the cush drive so it had to be turned down to a smaller diameter. Then the steel ring was fitted to make the original sprocket fit. Also the M8 studs are replaced by M10 fitted in steel inserts. Hans has a DB2SR and has already helped me a lot! Thank you Hans!

Today I went over to the local SKF bearing dealer and bought a bag of mixed bearings. (Rear wheel, cush drive, starter and swig arm bearings)
They had all the bearings I needed in stock except the one in the clutch pressure plate that has special grease with wider temperature range. However they made an order for it.
I asked if they had a discount for DIY enthusiast, and I got 25% ! Nice job! I also got a tube of Loctite 510 for the clutch basket bolts. It was €28 ($31) so it better be good!

As you can see in the picture below the original rear brake disc isn’t feeling very well. I earlier told that I got a disc and calliper from a Cagiva Mito. I now need to make a hub for the Mito disc, so I stayed some hour after work and started to turn a hub. It will not have shape as sophisticated as the original, but it will do until I can get something better.

2005-12-26

The last couple of days have been full of Christmas activities such as visiting family and friends, and eating ridiculously amounts of food! However since I have a bad habit of waking up really early even when I don’t need to go to work, I have had the time for some Bimota work as well.

Earlier I have noticed an unwanted clearance in the rear wheel bearings. They also didn’t sound quite well while turning the rear axle. Since I intend to buy some other bearings this week, I pulled the rear wheel axle assembly apart.

The two wheel bearings where 6004 2RS which are standard bearings with tow seals, but they where also rated C3 which means that hey have a larger clearance than standard. C3 bearings are normally used in high temperature applications such as crankshaft bearings, so I was a little surprised. If anyone knows about whether these bearings should be 3C rated or not, please add a comment in the Blog, or send me an email.

Also the rear sprocket hub looked a little strange. The rear sprocket is made from a sprocket blank, nothing strange about that, but there’s a steel spacer ring between the hub and the sprocket that can’t be found in the spare parts list. My guess is that the sprocket blanks came with an 80 mm inner diameter and the spacer ring was fitted to make it fit to the hub. If anyone knows any more please let me know!

2005-12-23

Clutch spring washers

The day before Christmas eve. Hardly anyone at work so after having a ridiculously long lunch I found myself just sitting at the office doing nothing! At half past one I punched out and went down in the workshop and loaded the turning machine with some aluminium bar. Two hours later I had a handful of clutch spring washers!

The plan is to have them anodized in some nice colour. I have a Ducati friend who can arrange that, if you give him a fair bribe. Usually it works if you make on set of parts for him to keep, so I had session of mass production, resulting in about 15 clutch spring washers.

Holidays are about to begin. I wish everyone a merry Chrismas!

2005-12-22

Christmas closing in

Christmas is closing in, and there have been lots of things to do besides working on the bike. However I have done some work:

I pulled of the vertical cylinder trying to be careful not to let any dirt fall into the crankcase. That was of course impossible so I made an adaptor for my vacuum cleaner so I could connect a small plastic hose that I could use down in the crankcase. I also used q-tips to clean out dirt that the vacuum cleaner would not get.
Under the vertical cylinder was lots of dirt and grit. The crankcase halves are also very dirty and oxidized. It will be a tricky (and boring) job to clean them enough to put some new paint on.
To prevent more dirt to get into the crankcase I also made a cover fort the vertical cylinder, the same way as for the vertical.

A couple of months ago I visited a bike shop and found that they had a good deal on a couple of Halvarssons racing leather suits. I tried one and it fit really well! Halvarssons is a Swedish manufacturer of biking clothes and their racing suits have a reputation of very good quality for reasonable money.
Since then I’ve been hesitating all autumn whether to buy it or not, but finally I decided to get it as a Christmas present for myself. (You can never be sure that Santa really shows up, and he really doesn’t seem to be very interested in motorcycles judging from the presents he usually brings…)
When I got the suit from the hanger I noticed a price tag with an even lower price. It turned out that the store accidentally had but on the price tag for the after Christmas sale, but they where really cooperative and I got it for the lower price!
I also needed a new pare of gloves, and got a good off season price for them as well:
Merry Christmas Lars!


2005-12-17

Ebay parts

I’ve bought some parts on German Ebay, and today the first parcel arrived. The clutch engine cover fitted on the bike is milled to be lighter and provide more cooling to the clutch. A really nice work, but since I intend to use the bike for track days, I would rather like to have the original cover. If I run of the track in a corner I don’t want the clutch full of grit. A fall would be expensive enough without damaging the clutch.

Sweden is a too small country to have a good market for used Ducati parts. I like to buy thinks on German Ebay. Lots of parts available and if you’re lucky you can get really got prices. Within the European Union you don’t need to pay custom fees, and paying by wire transfer is really easy using the Internet service of my bank. Also, sending parcels from Germany to Sweden is in fact cheaper than shipping within Sweden!

I paid about €40 for the cover including shipping, which I thought was OK, as it came with the oil pressure switch. The colour isn’t the same as the rest of the engine, but it doesn’t matter since I intend to paint it anyway.

2005-12-15

Nuts about nuts!

I need to remove the nuts for both the clutch basket and the alternator rotor, but since I don’t have the special holding tools I needed to figure out something else. A friend at work recently bought an electric impact nut runner (is that the correct English expression?) for changing tyres on his car, so I borrowed the machine and tried it on the Ducati engine. It was a complete success! It was enough to hold the flywheel and clutch center still by hand. Since I don’t had the correct heavy duty hex sockets, I was very careful using gloves and protective glasses in case a socket would break, but they where OK.

The nut runner was all right for loosening the nuts, but I need to get the proper holding tools for the assembly as I need to use torque wrench to get the right tightening torque.

2005-12-13

Disassembly continues

Back in the basement again! The horizontal cylinder is now off and being cleaned. The piston is also removed and cleaned from carbon deposits. Below you can see a picture of the connecting rod. The previous owner told me that there should be Carillo rods in this engine. I don’t know how either the original or the Carillos look, so if anyone knows please drop me an email!

To continue the work without the risk of getting dirt into the crankcase I made a protective cover from a piece of plastic and an old soda bottle. I put the old cylinder gasket in the photo copier and glued the paper on a piece of plastics. Then it was easy to drill the hole on the right place and cut out the contour.

When I had the engine running I noticed a small oil leakage at the screw right next to the spark plug. I did some search on the Internet, and found someone who had the same problem earlier: http://www.ducatitech.com/2v/maint/rebuild/ (Look at date 1/17/99). I examined the screw and found it to be made from aluminium, so I’d better be careful not to ruin it as I tried to remove it. Using a small dentist’s pick I cleaned the screwdriver slot as much as I could. Then I heated the head with a hot air gun at maximum temperature. Using a cordless screwdriver I tried to remove the screw starting with a low torque setting and increasing it stepwise. Finally the screw decided to cooperate and let itself be removed

I checked the spare parts list for a 900SSie -00, and it seems like the screw has been replaced by a hex socket screw with a crush washer, so I think I will go for that when I start to assemble things. I do need to machine the surface for the washer flat, but I think that will be no problem.


Something completely different

There's been no update in a couple of days, since I've been away over the weekend doing something completely different...

Stay tuned for more Bimota stuff!

2005-12-06

Bearing thoughts

I continued with removing the horizontal cylinder head and the engine timing pulleys. My home made tool for holding the pulleys works great! It’s a good thing I helped my friend Martin with some tools last winter, as I made two of each tool and kept one.

I continued cleaning parts and made a chart for the timing belt cover bolts. As you can see in the picture below, some of them really need to be excahnged. I’m putting together an Excel-file with all the bolts for all the engine covers as I intend to change all bolts for stainless ones. The list will also be a good aid for other Ducatisti in the future. I’ll also try to make bolt charts for all the engine covers.

Martin and I had a mail conversation about bearings today, and that inspired me to start a similar list for bearings as for the bolts. Having some focus on bearings I discovered that the bearing in the clutch pressure plate is the same bearing as on the cam belt tensioner (they have the same Ducati spare part no). The manufacturers part number is SKF 6201-2RS2/LHT23 where LHT23 tells that the bearing has a special grease with wider temperature range. It would probably not be a good idea to replace it with a standard bearing.


2005-12-05

Vertical head comes off

Today I disassembled the engine some more. I removed the clutch friction plates and the vertical cylinder head. I measured about half of the friction plates, and they where between 2.2-2.4mm. Wear limit is 2.15mm, so it seems like I don’t need to change them. I will measure all plates once more when I have cleaned them thoroughly.

Since the engine has been leaking some oil it is very dirty, and I have to move slowly and try do clean everything before I pull things apart. I don’t want any pieces of gravel to end up inside the engine case. When I popped the vertical head I was very curious about what cylinders that actually are fitted on the engine. I found the diameter to be 94mm, so it’s a 944cm3 big bore kit.


2005-12-04

Throttle control and engine disassembly


To design a throttle wire wheel for the Keihins I needed to do some measurements. First I measured the stroke of the Keihins, using the excellent timing disc found at http://www.machinerycleanery.com/index.htm .
A full stroke of the throttels corresponds to 80° turning of the throttle shaft.
As I indent to use the original Ducati throttle control, I needed to measure that as well. Using the same timing disc as earlier, I measured that 1° turning of the control corresponds to 0.37 mm pull of the throttle cable. Now I have all I nedd to get back to the drawingboard!

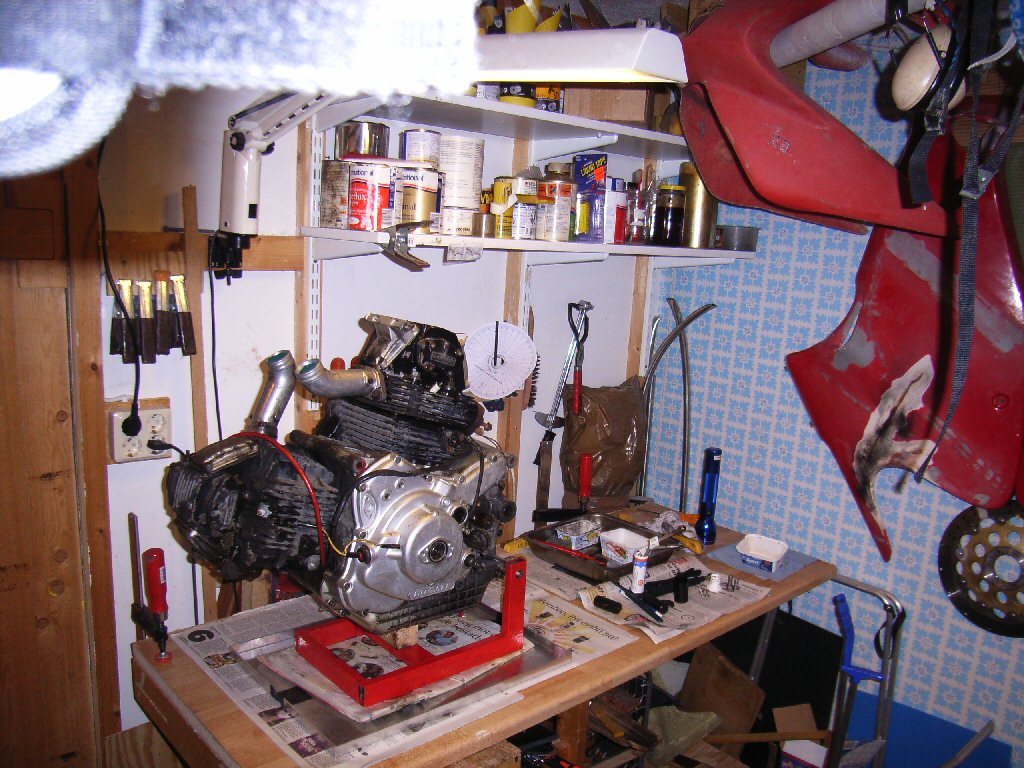
Today I also got the engine up on the bench. As you can see the finish isn’t too good. I’ll try to do something abput it eventhough it’s not my main goal. I started to pull the engine apart. First off are the starter and the engine generator cover. I also disassembled the starter. I found nothing exceptional that could explain the starting problems, but the brushes where quite worn, and the commutator bars had some oxides. Also the ball bearing didn’t feel 100% so I think I’ll change that too.


2005-12-02

Swing arm end plugs and T-shirt


The original rubber end plugs for the swing arm shaft are missing. I’m pretty sure that it’s the same plugs as on the Ducati Supersport, but isn’t rubber plugs a little bit boring, so today I made some “shopping” (that’s two hours in the small mechanical workshop at work). The result wasn’t too bad I think, and the plugs will be even nicer when I get them anodized.

When I got home I found a parcel in the mailbox. It was the Bimota T-shirt I ordered last week. Not very good quality fabric, but a nice design!

2005-11-30

Engine cover puller and tires


Today I made a tool for polling off the alternator engine cover. It’s simply a 10mm aluminium bar with two holes for M6 screws on each side of a threaded hole. The C-C distance between the outer holes is 56mm, and I used a M10 bolt in the middle. I made the end of the bolt pointy to fit into the end of the crankshaft.

Josè, from who I bought the DB2, occasionally orders tires from Spain. He made an order some week ago and tonight I went to I pick the set of Pirelli Diablo Corsa I ordered. It seems crazy to buy tires from Spain, but for some reason tires are very expensive in Sweden. By ordering from Spain I get a complete set for the same price as a rear would have cost me in Sweden, even including shipping!

2005-11-27

Removing engine

Today I pulled the engine out of the frame, or more correctly removed the frame from the engine. I used a hydraulic jack to support the engine when I removed all the bolts, and then I could lower the engine using the jack. It was then an easy task to just lift the frame up in the rear end and roll it free from the engine forward on the front wheel.


I brought the engine home from the garage and now it rests in the basement until I start to pull it apart.

2005-11-26

Engine Stand

Inspired by some pictures I got from a fellow Ducatisti (Zoman) i blew the dust of my welder and made an engine stand. A very simple design, but I think it will help a lot while working on the engine later on.

2005-11-25

Keihin aligning

Today I did some work on the Keihins. I have bought new bearings so I cleaned the new ones in the ultrasonic washer with acetone and filled them with silicon grease, that I believe will have some resistance to petrol.

I also worked some more on the spacers to do the final tuning to get the throttle shaft seats properly aligned. Since the bearing was removed I could use the pairs of 9mm holes in each carb. I had some trouble finding a 9mm shaft, but finally I got the idea to use a long drill! I did some adjustments on the lengths of the spacers and also decreased the diameter about 0,1mm. The Keihins have quite a lot of burrs from the casting so I did some burring where needed.

2005-11-23

Bible and rear end support

Today I visited a supplier downtown Stockholm, so after the visit I went over to MarGie Bookshop and picked up the book I ordered some weeks ago. You can´t be a believer without a bible! (still wrapped in plastics)


I spent the evening in the garage. First I removed the back wheel and cleaned the threads for the excenter clamps. I changed the rusty bolts for A4 stainless and lubricated everything with lithium grease. It's my intention to change as many bolts as possible to stainless.
I also loosened the rear wheel axle to be able to dismount it with the wheel removed. Earlier I have felt a slight play in the rear wheel bearings and when I removed the wheel I could hear that they didn’t sound or felt well. Replacing them definitely goes on the list!


I also built a stand to support the rear end of the bike in order to remove the swing arm and the engine. Not the most rigid thing in the world, but it does the job. With the bike on the stand I could remove the rear shock and lower the swing arm to get access to the right clamping bolt for the swing arm shaft. I tried the shaft and it moves without excessive force.


Finally I loosened all the cylinder nuts. Since I plan to remove the cylinders to change gaskets to fix some oil leakage, I thought it would be wise to loosen the nuts with the engine still in the frame if they where stuck. I used a home made copy of Ducatis special tool for this.

2005-11-21

Sprockets and chain

Today i recieved an email with prices from a German company Wieres. They sell chain kits for the DB2, with both rear sprockets with 5 and 6 mounting holes.

Prices are reasonable I think. You can choose front sprocket 14 or 15 teeth, and rear 36-49 teeth. With a standard DID VM X-ring chain and front and rear sprocket (aluminium) of any size the kit is €144,70 ($170). Shipping to Sweden is €23. You can also upgrade to ZMV or ERV chains.

More info at their web site: http://www.wieres.de or by email depa@wieres.de

2005-11-20

Working weekend

This weekend I spent some hours in the garage. First I did some more experiments to try to understand why the starter hardly moves. I tried with a newly charged battery from my 750SS that works perfect on that bike: Not a turn on the starter!
Then I tried to connect that battery directly to the starter with a couple of jump starting cables: No difference! So my conclusion is that it’s the starter that is faulty. I’ll tear it apart when I can remove it from the engine.

I jump started the bike with a car battery (the starter cranks really slow even with a car battery) and warmed it up to drain the oil. I found nothing extraordinary on the oil plug magnet, but the wirenet filter held some not so nice particles. In the picture you can se a steel splinter pointing out from the filter. I found two more similar pieces in the filter.
When I spoke to my friend Tom about it he showed me this webpage: http://www.moto-one.com.au/performance/888part4.html
I’ll better keep an eye on that plug when I remove the cylinders later on.


Now everything is set for removing the engine. What was a running bike less than a month ago is now more a frame with wheels and a pile of parts. I hope I get everything back together…

2005-11-16

Rescuing the original carbs

The original carbs have been put aside by a previous owner since the idling mixture screw was stuck and the screwdriver grove has been damaged by excessive force.
On the bike right now are carbs from a Monster 900.

In an attempt to rescue the original carb I put it up in the milling machine and removed the damaged part of the screw and drilled a hole in the middle. By using a Torx-screwdriver forced down the hole I could move the screw just a little back and forth. Aided by oil and a hot air gun I finally managed to remove the screw. Success!!

I will now put the original carbs away and continue to work on the Keihins, as I hope to be able to use them on the bike for next season.

2005-11-14

Examining carbs


Tonight I went over to Torbjörn Sjöberg, a friend from the Swedish Ducati Club. His Ducati Monster is really one of a kind! Since he has fitted a par of Keihin FCR41 carbs on the Monster, I asked him if I could pop by and have a look at the carb setup. It’s always easier to get a grip of things when you see them IRL !

Torbjörn gave me some really useful advice, and I will continue the work of getting the FCRs together.

Read the story of Torbjörns remarkable Monster at: http://www.ebbot.net/ducati/m900crsp/